CentOS 8 - Monitoring install for Zabbix 5.0 LTS open source

자빅스(Zabbix) [공식 홈페이지]
간단하게 말하면 네트워크나 서버(가상)등을 포함한 서비스들을 감시하고 실시간으로 자원을 체크하여 관리자에게 신속히 알리기 위한 네트워크 관리 솔루션 소프트웨어입니다. Zabbix 에이전트를 Unix, Linux, Windows 등의 OS에 설치하여 CPU, MEM, 파일 시스템(용량), 특정 TCP 등을 포함한 많은 정보를 포함하여 감시를 할 수 있으며 장애 대비 모니터링으로써도 탁월합니다.
해외 소프트웨어이긴 하지만 무료 모니터링 오픈소스이며 무료라고 해서 기능이 제한적이거나 하지 않습니다. 거의 우리나라 상용 모니터링 솔루션과 비교해도 될 만큼 그 기능이 다양하며 접근성이 용이합니다. 필요하다면 솔루션 업체에 상담 및 일정 비용을 지불하여 원격지원을 받을 수도 있습니다.
■ [설치환경 및 준비물]
릴리즈 설치 테스트 : 2020-06-29
CentOS 8 리눅스 설치 서버 [포스팅 참고]
OS 버전
[root@localhost ~]# cat /etc/redhat-release
CentOS Linux release 8.1.1911 (Core)
※ CentOS 8 커널 5.7 적용 후 테스트 진행 [기본 커널에서 작업해도 상관없음]
[root@localhost ~]# uname -r
5.7.2-1.el8.elrepo.x86_64
■ 진행순서
1. Yum 설치를 위한 Zabbix 저장소 추가
[root@localhost ~]# rpm -ivh http://repo.zabbix.com/zabbix/5.0/rhel/8/x86_64/zabbix-release-5.0-1.el8.noarch.rpm
...
Updating / installing...
1:zabbix-release-5.0-1.el8 ################################# [100%]
※ Zabbix 공식 저장소[스크린샷 참고] - http://repo.zabbix.com/zabbix/
※ Zabbix 공식 매뉴얼[한국어는 없음] - https://www.zabbix.com/manuals
접속을 하면 버전별로 파일이 업로드되어있습니다. 설치하려는 버전에 맞게 RPM 정보를 가져오면 됩니다.
릴리즈 버전 [2020-05-20] : zabbix-release-5.0-1.el8.noarch.rpm

2. Zabbix / DB(MariaDB) / WEB(Apache) / PHP 한 번에 설치 진행
[root@localhost ~]# yum install zabbix-server-mysql zabbix-web-mysql mariadb-server zabbix-apache-conf zabbix-agent
==========================================================================================
Package Arch Version Repository Size
==========================================================================================
Installing:
mariadb-server x86_64 3:10.3.17-1.module_el8.1.0+257+48736ea6 AppStream 16 M
zabbix-agent x86_64 5.0.1-1.el8 zabbix 454 k
zabbix-apache-conf noarch 5.0.1-1.el8 zabbix 17 k
zabbix-server-mysql x86_64 5.0.1-1.el8 zabbix 2.6 M
zabbix-web-mysql noarch 5.0.1-1.el8 zabbix 16 k
Installing dependencies:
apr x86_64 1.6.3-9.el8 AppStream 125 k
apr-util x86_64 1.6.1-6.el8 AppStream 105 k
httpd x86_64 2.4.37-21.module_el8.2.0+382+15b0afa8 AppStream 1.7 M
httpd-filesystem noarch 2.4.37-21.module_el8.2.0+382+15b0afa8 AppStream 36 k
httpd-tools x86_64 2.4.37-21.module_el8.2.0+382+15b0afa8 AppStream 103 k
mariadb x86_64 3:10.3.17-1.module_el8.1.0+257+48736ea6 AppStream 6.1 M
mariadb-common x86_64 3:10.3.17-1.module_el8.1.0+257+48736ea6 AppStream 62 k
mariadb-connector-c x86_64 3.0.7-1.el8 AppStream 148 k
mariadb-connector-c-config noarch 3.0.7-1.el8 AppStream 13 k
mariadb-errmsg x86_64 3:10.3.17-1.module_el8.1.0+257+48736ea6 AppStream 232 k
mod_http2 x86_64 1.11.3-3.module_el8.2.0+307+4d18d695 AppStream 157 k
nginx-filesystem noarch 1:1.14.1-9.module_el8.0.0+184+e34fea82 AppStream 24 k
perl-DBD-MySQL x86_64 4.046-3.module_el8.1.0+203+e45423dc AppStream 156 k
perl-DBI x86_64 1.641-3.module_el8.1.0+199+8f0a6bbd AppStream 740 k
php-bcmath x86_64 7.2.24-1.module_el8.2.0+313+b04d0a66 AppStream 79 k
php-common x86_64 7.2.24-1.module_el8.2.0+313+b04d0a66 AppStream 661 k
php-fpm x86_64 7.2.24-1.module_el8.2.0+313+b04d0a66 AppStream 1.6 M
php-gd x86_64 7.2.24-1.module_el8.2.0+313+b04d0a66 AppStream 84 k
php-json x86_64 7.2.24-1.module_el8.2.0+313+b04d0a66 AppStream 73 k
php-ldap x86_64 7.2.24-1.module_el8.2.0+313+b04d0a66 AppStream 79 k
php-mbstring x86_64 7.2.24-1.module_el8.2.0+313+b04d0a66 AppStream 580 k
php-mysqlnd x86_64 7.2.24-1.module_el8.2.0+313+b04d0a66 AppStream 190 k
php-pdo x86_64 7.2.24-1.module_el8.2.0+313+b04d0a66 AppStream 122 k
php-xml x86_64 7.2.24-1.module_el8.2.0+313+b04d0a66 AppStream 188 k
unixODBC x86_64 2.3.7-1.el8 AppStream 458 k
OpenIPMI-libs x86_64 2.0.27-1.el8 BaseOS 507 k
centos-logos-httpd noarch 80.5-2.el8 BaseOS 24 k
dejavu-fonts-common noarch 2.35-6.el8 BaseOS 74 k
dejavu-sans-fonts noarch 2.35-6.el8 BaseOS 1.5 M
net-snmp-libs x86_64 1:5.8-14.el8 BaseOS 821 k
perl-Math-BigInt noarch 1:1.9998.11-7.el8 BaseOS 196 k
perl-Math-Complex noarch 1.59-416.el8 BaseOS 108 k
zabbix-web noarch 5.0.1-1.el8 zabbix 3.1 M
fping x86_64 3.16-1.el8 zabbix-non-supported 51 k
Installing weak dependencies:
apr-util-bdb x86_64 1.6.1-6.el8 AppStream 25 k
apr-util-openssl x86_64 1.6.1-6.el8 AppStream 27 k
mariadb-backup x86_64 3:10.3.17-1.module_el8.1.0+257+48736ea6 AppStream 6.0 M
mariadb-gssapi-server x86_64 3:10.3.17-1.module_el8.1.0+257+48736ea6 AppStream 49 k
mariadb-server-utils x86_64 3:10.3.17-1.module_el8.1.0+257+48736ea6 AppStream 1.6 M
Enabling module streams:
httpd 2.4
mariadb 10.3
nginx 1.14
perl-DBD-MySQL 4.046
perl-DBI 1.641
php 7.2
Transaction Summary
========================================================================================
설치 44 Package
Total download size: 47 M
Installed size: 232 M
Is this ok [y/N]: y
설치됨:
mariadb-server-3:10.3.17-1.module_el8.1.0+257+48736ea6.x86_64 zabbix-agent-5.0.1-1.el8.x86_64
zabbix-apache-conf-5.0.1-1.el8.noarch zabbix-server-mysql-5.0.1-1.el8.x86_64
zabbix-web-mysql-5.0.1-1.el8.noarch
apr-util-bdb-1.6.1-6.el8.x86_64 apr-util-openssl-1.6.1-6.el8.x86_64
mariadb-backup-3:10.3.17-1.module_el8.1.0+257+48736ea6.x86_64
mariadb-gssapi-server-3:10.3.17-1.module_el8.1.0+257+48736ea6.x86_64
mariadb-server-utils-3:10.3.17-1.module_el8.1.0+257+48736ea6.x86_64
apr-1.6.3-9.el8.x86_64 apr-util-1.6.1-6.el8.x86_64
httpd-2.4.37-21.module_el8.2.0+382+15b0afa8.x86_64
httpd-filesystem-2.4.37-21.module_el8.2.0+382+15b0afa8.noarch
httpd-tools-2.4.37-21.module_el8.2.0+382+15b0afa8.x86_64
mariadb-3:10.3.17-1.module_el8.1.0+257+48736ea6.x86_64
mariadb-common-3:10.3.17-1.module_el8.1.0+257+48736ea6.x86_64
mariadb-connector-c-3.0.7-1.el8.x86_64 mariadb-connector-c-config-3.0.7-1.el8.noarch
mariadb-errmsg-3:10.3.17-1.module_el8.1.0+257+48736ea6.x86_64
mod_http2-1.11.3-3.module_el8.2.0+307+4d18d695.x86_64
nginx-filesystem-1:1.14.1-9.module_el8.0.0+184+e34fea82.noarch
perl-DBD-MySQL-4.046-3.module_el8.1.0+203+e45423dc.x86_64
perl-DBI-1.641-3.module_el8.1.0+199+8f0a6bbd.x86_64
php-bcmath-7.2.24-1.module_el8.2.0+313+b04d0a66.x86_64
php-common-7.2.24-1.module_el8.2.0+313+b04d0a66.x86_64
php-fpm-7.2.24-1.module_el8.2.0+313+b04d0a66.x86_64
php-gd-7.2.24-1.module_el8.2.0+313+b04d0a66.x86_64
php-json-7.2.24-1.module_el8.2.0+313+b04d0a66.x86_64
php-ldap-7.2.24-1.module_el8.2.0+313+b04d0a66.x86_64
php-mbstring-7.2.24-1.module_el8.2.0+313+b04d0a66.x86_64
php-mysqlnd-7.2.24-1.module_el8.2.0+313+b04d0a66.x86_64
php-pdo-7.2.24-1.module_el8.2.0+313+b04d0a66.x86_64
php-xml-7.2.24-1.module_el8.2.0+313+b04d0a66.x86_64
unixODBC-2.3.7-1.el8.x86_64 OpenIPMI-libs-2.0.27-1.el8.x86_64
centos-logos-httpd-80.5-2.el8.noarch
dejavu-fonts-common-2.35-6.el8.noarch dejavu-sans-fonts-2.35-6.el8.noarch
net-snmp-libs-1:5.8-14.el8.x86_64
perl-Math-BigInt-1:1.9998.11-7.el8.noarch perl-Math-Complex-1.59-416.el8.noarch
zabbix-web-5.0.1-1.el8.noarch fping-3.16-1.el8.x86_64
3. DB(MariaDB) 실행 및 설정
3-1 DB 구동 및 프로세스 확인
□ MariaDB 구동
[root@localhost ~]# systemctl start mariadb
□ 부팅 시 자동 시작 활성화
[root@localhost ~]# systemctl enable mariadb
□ 프로세스 확인
[root@localhost ~]# ps -ef | grep mysql
mysql 9817 1 2 22:55? 00:00:00 /usr/libexec/mysqld --basedir=/usr
3-2 MariaDB 기본 설정
[root@localhost ~]# mysql_secure_installation
NOTE: RUNNING ALL PARTS OF THIS SCRIPT IS RECOMMENDED FOR ALL MariaDB
SERVERS IN PRODUCTION USE! PLEASE READ EACH STEP CAREFULLY!
In order to log into MariaDB to secure it, we'll need the current
password for the root user. If you've just installed MariaDB, and
you haven't set the root password yet, the password will be blank,
so you should just press enter here.
Enter current password for root (enter for none): [패스워드가 없기 때문에 엔터]
OK, successfully used password, moving on...
Setting the root password ensures that nobody can log into the MariaDB
root user without the proper authorisation.
Set root password? [Y/n] Y [DB ROOT 패스워드 설정]
New password: 패스워드 입력
Re-enter new password: 패스워드 재입력
Password updated successfully!
Reloading privilege tables..
... Success!
By default, a MariaDB installation has an anonymous user, allowing anyone
to log into MariaDB without having to have a user account created for
them. This is intended only for testing, and to make the installation
go a bit smoother. You should remove them before moving into a
production environment.
Remove anonymous users? [Y/n] Y [익명의 접근을 막을 것인지? 보안을 위해 Y 엔터]
... Success!
Normally, root should only be allowed to connect from 'localhost'. This
ensures that someone cannot guess at the root password from the network.
Disallow root login remotely? [Y/n] Y [DB ROOT 원격을 막을 것인지? 보안을 위해 Y 엔터]
... Success!
By default, MariaDB comes with a database named 'test' that anyone can
access. This is also intended only for testing, and should be removed
before moving into a production environment.
Remove test database and access to it? [Y/n] Y [Test 용으로 생성된 데이터베이스를 삭제할 것인가? Y 엔터]
- Dropping test database...
... Success!
- Removing privileges on test database...
... Success!
Reloading the privilege tables will ensure that all changes made so far
will take effect immediately.
Reload privilege tables now? [Y/n] Y [현재 설정한 값을 적용할 것인지? 당연히 Y 엔터]
... Success!
Cleaning up...
All done! If you've completed all of the above steps, your MariaDB
installation should now be secure.
Thanks for using MariaDB! [완료]
3-3 MariaDB 접속 및 Zabbix 데이터베이스 생성
[root@localhost ~]# mysql -u root -p
Enter password: 패스워드 입력
Welcome to the MariaDB monitor. Commands end with ; or \g.
Your MariaDB connection id is 16
Server version: 10.3.17-MariaDB MariaDB Server
Copyright (c) 2000, 2018, Oracle, MariaDB Corporation Ab and others.
Type 'help;' or '\h' for help. Type '\c' to clear the current input statement.
□ Zabbix 데이터 베이스 생성[ ※ 중요! UTF8 생성]
MariaDB [(none)]> create database zabbix character set utf8 collate utf8_bin;
Query OK, 1 row affected (0.001 sec)
□ 권한 부여
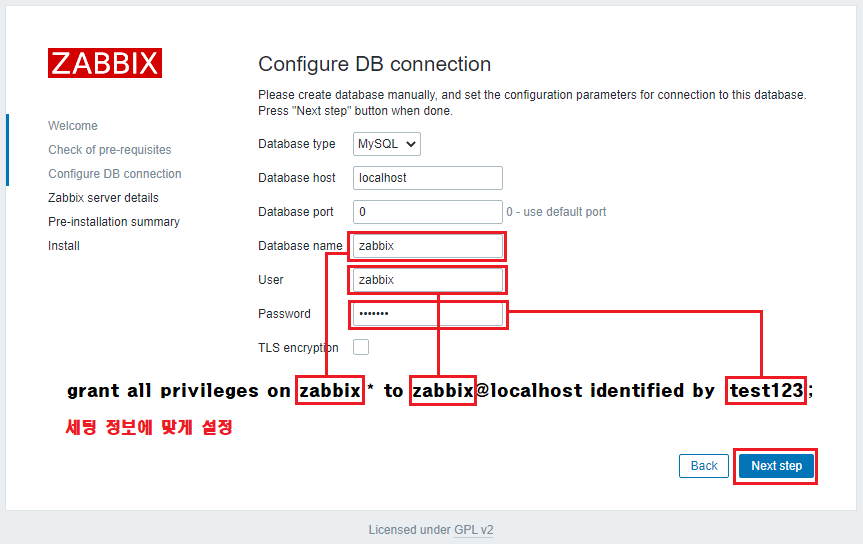
MariaDB [(none)]> grant all privileges on zabbix.* to zabbix@localhost identified by 'test123';
Query OK, 0 rows affected (0.001 sec)
□ 적용 후 종료
MariaDB [(none)]> flush privileges;
Query OK, 0 rows affected (0.001 sec)
MariaDB [(none)]> exit
Bye
4. Zabbix 초기 테이블 값 정보 데이터베이스에 적용
□ 경로 이동
[root@localhost ~]# cd /usr/share/doc/zabbix-server-mysql/
□ 압축해제
[root@localhost zabbix-server-mysql]# gunzip create.sql.gz
[root@localhost zabbix-server-mysql]# ls
AUTHORS COPYING ChangeLog NEWS README create.sql (파일 확인) double.sql
□ Zabbix 데이터베이스에 복원
[root@localhost zabbix-server-mysql]# mysql -u root -p zabbix < create.sql
Enter password: 패스워드 입력
5. Zabbix Config 설정[수정 후 저장]
[root@localhost ~]# vi /etc/zabbix/zabbix_server.conf
38 LogFile=/var/log/zabbix/zabbix_server.log [기본 설정]
72 PidFile=/var/run/zabbix/zabbix_server.pid [기본 설정]
82 SocketDir=/var/run/zabbix [기본 설정]
91 DBHost=localhost [주석(#) 제거]
100 DBName=zabbix [DB 생성 이름과 동일하게 설정]
116 DBUser=zabbix [DB 유저 생성 이름과 동일하게 설정]
124 DBPassword=test123 [주석(#) 제거 후 DB 유저 패스워드와 동일하게 설정]
6. Zabbix PHP-FPM Config 설정[수정 후 저장]
□ 기본 셋팅되어 있으므로 하나의 라인만 수정
[root@localhost zabbix-server-mysql]# vi /etc/php-fpm.d/zabbix.conf
[zabbix]
user = apache
group = apache
listen = /run/php-fpm/zabbix.sock
listen.acl_users = apache,nginx
listen.allowed_clients = 127.0.0.1
pm = dynamic
pm.max_children = 50
pm.start_servers = 5
pm.min_spare_servers = 5
pm.max_spare_servers = 35
php_value[session.save_handler] = files
php_value[session.save_path] = /var/lib/php/session
php_value[max_execution_time] = 300
php_value[memory_limit] = 128M
php_value[post_max_size] = 16M
php_value[upload_max_filesize] = 2M
php_value[max_input_time] = 300
php_value[max_input_vars] = 10000
php_value[date.timezone] = Asia/Seoul [주석(;) 제거 후 한국 시간으로 수정]
7. IPTABLES 방화벽 포트 허용 및 재시작
□ 수정 후 저장
[root@localhost ~]# vi /etc/sysconfig/iptables
# sample configuration for iptables service
# you can edit this manually or use system-config-firewall
# please do not ask us to add additional ports/services to this default configuration
*filter
:INPUT ACCEPT [0:0]
:FORWARD ACCEPT [0:0]
:OUTPUT ACCEPT [0:0]
-A INPUT -m state --state RELATED,ESTABLISHED -j ACCEPT
-A INPUT -p icmp -j ACCEPT
-A INPUT -i lo -j ACCEPT
-A INPUT -p tcp -m state --state NEW -m tcp --dport 8888 -j ACCEPT
-A INPUT -p tcp -m state --state NEW -m tcp --dport 80 -j ACCEPT [HTTP 웹포트 (추가)]
-A INPUT -p tcp -m state --state NEW -m tcp --dport 10050 -j ACCEPT [Zabbix Agent 포트 (추가)]
-A INPUT -p tcp -m state --state NEW -m tcp --dport 10051 -j ACCEPT [Zabbix Server 포트 (추가)]
-A INPUT -j REJECT --reject-with icmp-host-prohibited
-A FORWARD -j REJECT --reject-with icmp-host-prohibited
COMMIT
□ 재시작
[root@localhost ~]# systemctl restart iptables
□ 적용 확인[허용된 포트 확인]
[root@localhost zabbix-server-mysql]# iptables -nL
ACCEPT tcp -- 0.0.0.0/0 0.0.0.0/0 state NEW tcp dpt:80
ACCEPT tcp -- 0.0.0.0/0 0.0.0.0/0 state NEW tcp dpt:10050
ACCEPT tcp -- 0.0.0.0/0 0.0.0.0/0 state NEW tcp dpt:10051
8. Zabbix Server / HTTPD / PHP-FPM 서비스 구동
□ 전체 구동
[root@localhost ~]# systemctl start zabbix-server httpd php-fpm
□ 부팅 시 자동 활성화
[root@localhost ~]# systemctl enable zabbix-server httpd php-fpm
□ 프로세스 구동 확인[Zabbix의 경우는 스크린샷 참고]
[root@localhost ~]# ps -ef | egrep "httpd|zabbix"
zabbix 10162 1 0 01:06 ? 00:00:00 /usr/sbin/zabbix_server -c /etc/zabbix/zabbix_server.conf
apache 10477 10470 0 01:11 ? 00:00:00 /usr/sbin/httpd -DFOREGROUND
apache 10478 10471 0 01:11 ? 00:00:00 php-fpm: pool zabbix

9. Zabbix Web 설치 페이지 접속 [http://서버IP 또는 호스트네임/zabbix]
9-1 본인 PC에서 [ URL : http://192.168.232.128/zabbix ] 접속을 합니다. NEXT

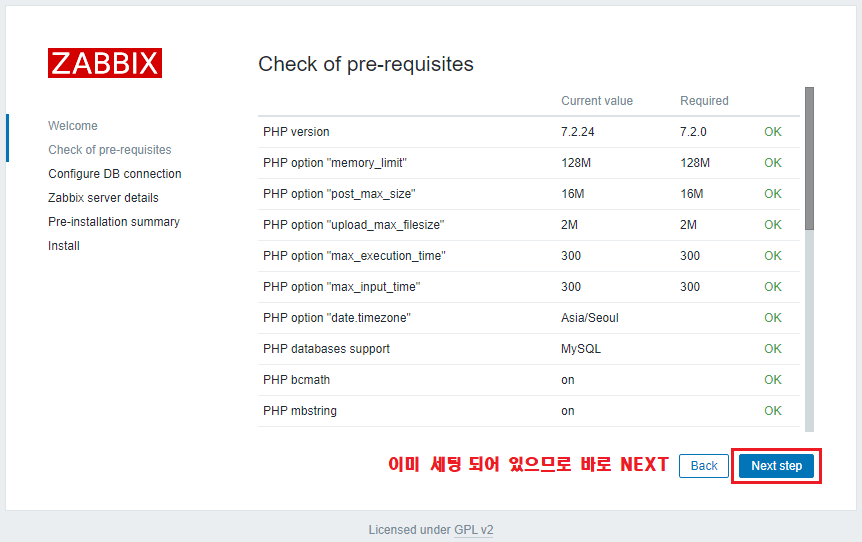
9-2 미리 세팅되어 있으므로 바로 NEXT
9-3 DB 세팅 정보에 맞게 설정 후 NEXT
9-4 빈칸으로 넘어가거나 입력 후 NEXT

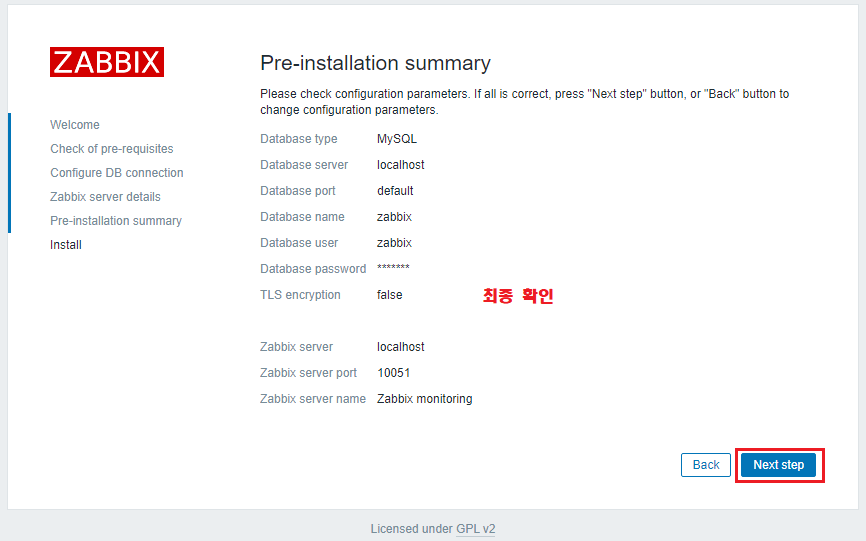
9-5 최종 세팅 확인
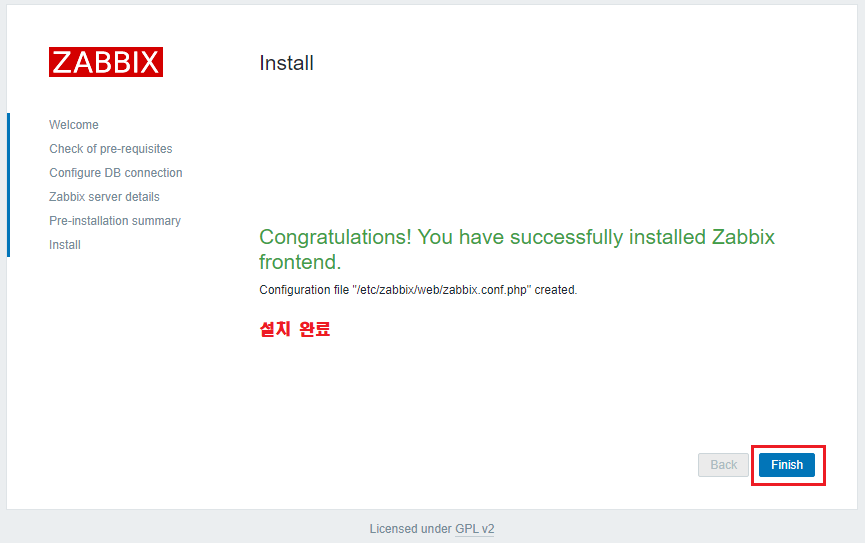
9-6 설치 완료
9-7 설치 후 처음 웹 관리자 로그인 페이지 접속 정보는 [ ID : Admin / PASS : zabbix ]입니다. [대소문자 주의]

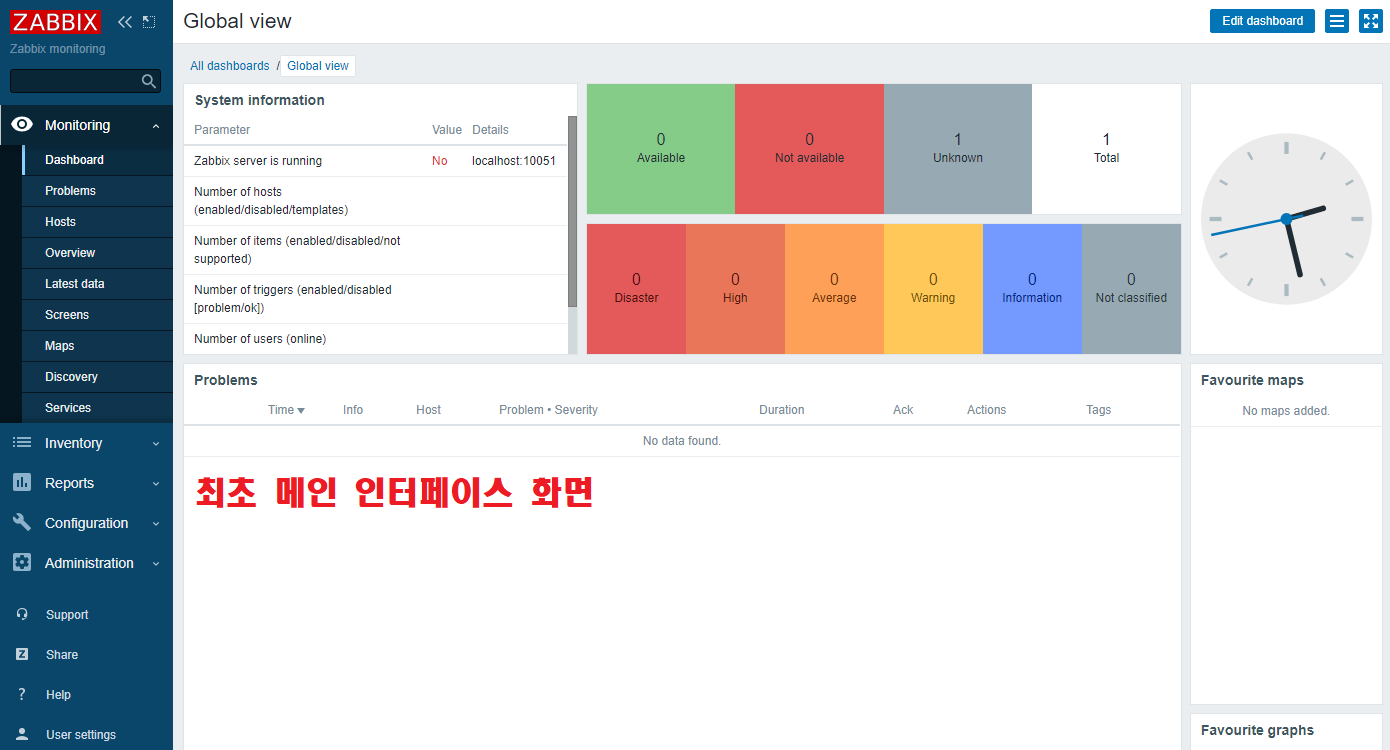
9-8 최초 메인 인터페이스 접속 화면
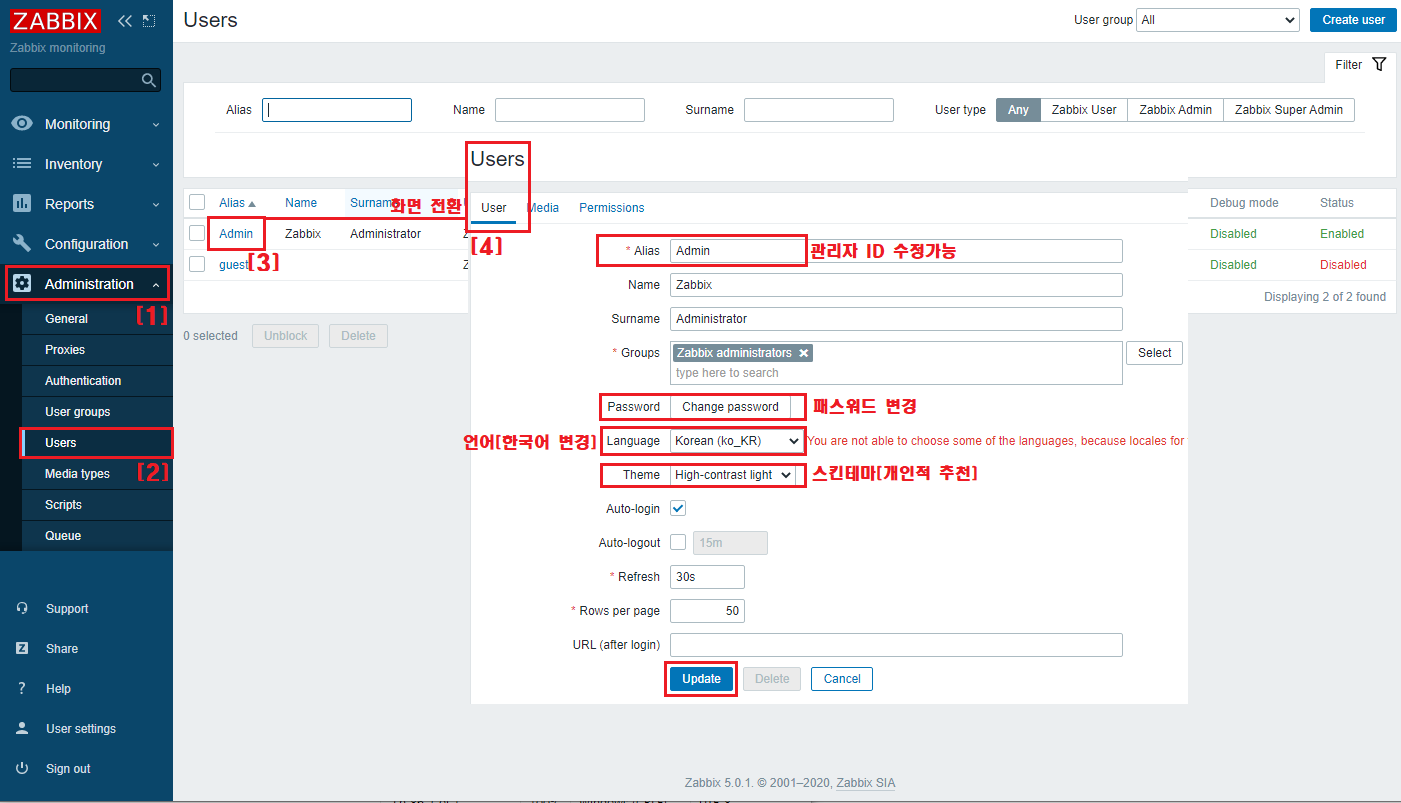
10. 웹 관리자 기본 설정 [Administration ▷ Users ▷ Admin 계정 클릭]
※ Alias - Admin 관리자 ID 수정 가능
※ Password - 관리자 패스워드 변경 HIGH!
※ Language - 언어 설정[Korean (ko_KR)][디폴트 언어는 영어와 한국어만 있으므로 그 외에는 언어팩 설치해야 가능]
※ Theme - 스킨 테마 설정[개인적으로 High-contrast light를 추천함]
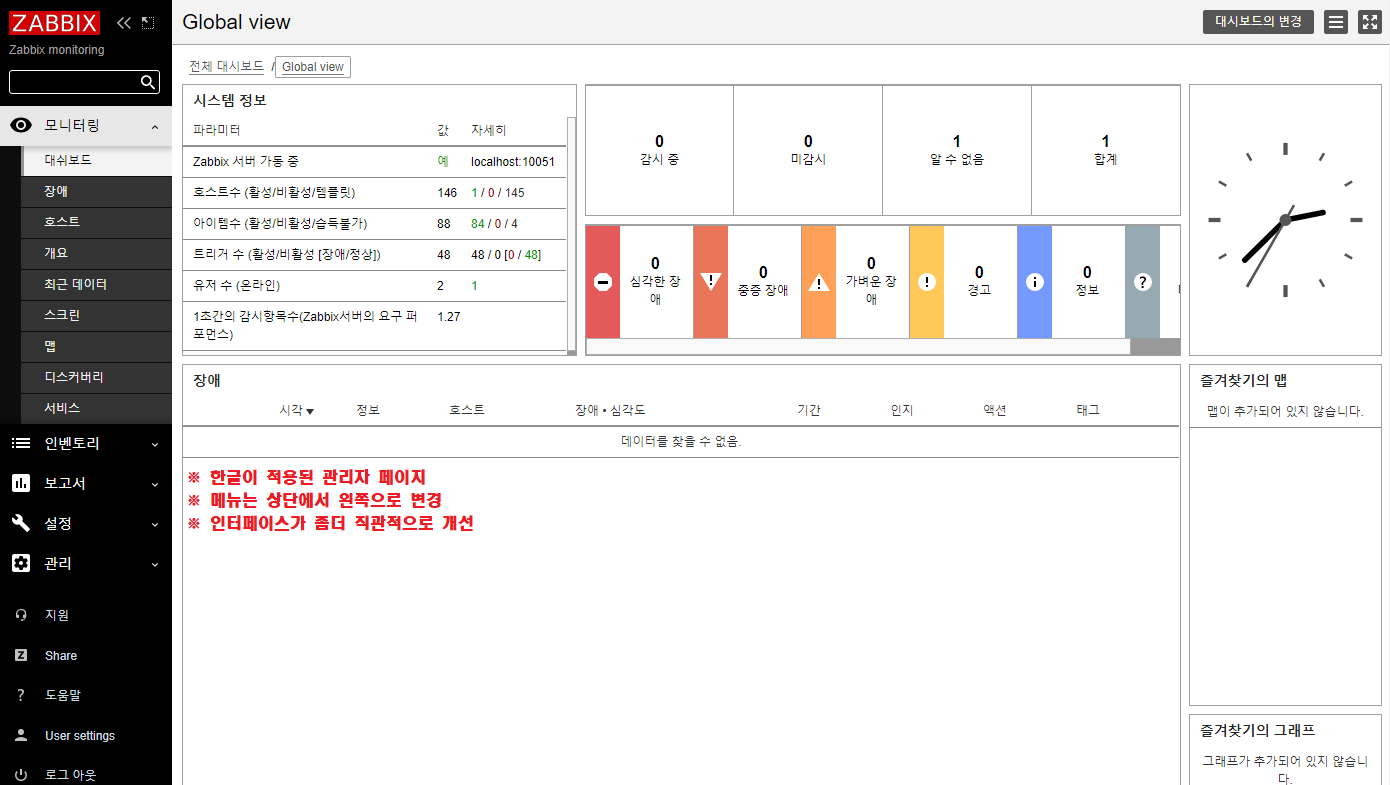
11. 업데이트 후 한글이 적용된 관리자 페이지
다음과 같이 순차적으로 진행하면 10분 안에 모니터링 서버를 만들 수 있습니다.
PS.
저의 경우는 자빅스를 처음 2.X 접하고 3.X부터 본격적으로 이용을 하였으며 현재는 4.X 안정화 버전을 이용하여 약 100대 이상의 서버[Linux/Windows/일부 네트워크 장비]를 감시하고 있습니다. 하드웨어는 VM 가상화를 이용하고 있으며 인텔 코어 기준 [Intel(R) Xeon(R) CPU E7- 4850 @ 2.00 GHz] 물리 코어 X4 / 메모리 4G / 용량 100GB 할당하여 솔루션 설치 옵션도 기본으로 이용하고 있지만 1년 동안 아무 문제가 없었으며 상당히 가볍게 운행되고 있습니다. Zabbix도 무료 오픈소스이지만 많이 대중화되었으며 공식 한국어 매뉴얼은 없지만 일부 한국 대기업에서도 이 Zabbix를 이용하고 있기 때문에 검색하면 자료도 많습니다. 국내 모니터링 솔루션 라이선스는 부르는 게 값이다 보니 비용이 부담스러운 신 분들은 자빅스를 이용해 보는 것도 하나의 대안이 될 것으로 보입니다.
'◈『Open(Source) Solution』 > 자빅스(Zabbix)' 카테고리의 다른 글
| Zabbix 5.0 LTS + 텔레그램 연동 [2] (0) | 2020.07.16 |
|---|---|
| Zabbix 5.0 LTS + 텔레그램 연동 [1] (0) | 2020.07.15 |
| Zabbix Agent Install - Windows [수동 설치] (0) | 2020.07.08 |
| Zabbix Agent Install - Windows [MSI 설치] (0) | 2020.07.07 |
| Zabbix Agent Install - Linux [CentOS] (0) | 2020.07.03 |